Overview
There are four options to install and run the MDO Agent Deck framework: (A) Local Computers with LLM Apps, (B) Local Computers with VSCode, (C) HPC Clusters with LLM Apps, and (D) HPC Clusters with VSCode. Options A and B run on your local computer using pre-compiled Docker images, while Options C and D run on a high-performance computing (HPC) cluster with self-compiled codes. You need to choose ONLY ONE option to follow. If you are new to the MDO Agent Deck, we recommend you choose Option A, which is the easiest to set up and run.
Latest Version: v0.2.3
You need to use matching versions for the Docker image dafoam/agent:<versioin>, mdo_agent_deck, and mdo_agent_work. The commands and links below point to v0.2.3. If you want to use a different version, change the tag v0.2.3 accordingly.
Option A: Local Computers with LLM Apps
This option works for both Windows and MacOS, and it is the easiest way to run the agents with small cases. If you plan to run larger cases, e.g., wing aero-structural optimization, you need to install the agents on an HPC (see Options C and D).
Step 1. Install an LLM Desktop App
First, install an LLM Desktop App. The MDO Agent Deck supports multiple LLMs, but for this setup, you need to install ONLY ONE LLM app.
NOTE: You must sign up for an account for the selected LLM and log in using your subscription. Do NOT use API keys. If you already have a paid subscription for one of the following LLM providers, install its app. Otherwise, choose an LLM that offers a free but limited usage quota (we recommend Codex). Note that most free-tier LLMs limit you to roughly 10 prompts per cycle and are suitable for evaluation only. For production use, a paid plan is required.
Step 2. Install Docker Desktop
Download and install the Docker Desktop app for:
After the Docker Desktop is installed, open it and keep it open. In the Docker app, go to Settings->Resources->Network and check Enable host networking. This setup will allow Docker to return html servers for interactive visualization.
Then, open a terminal and run the following command to download the pre-compiled MDO Agent Deck image:
docker pull dafoam/agent:v0.2.3
If you want to install a different version, change the tag v0.2.3 accordingly.
Step 3. Download the working directory
Download mdo_agent_work version v0.2.3. If you want to install a different version, change the tag v0.2.3 accordingly, but make sure its version is consistent with the Docker image version above.
Unzip it and you will see a folder called mdo_agent_work-v0.2.3. Rename it to mdo_agent_work. This will be the main working directory for your agents.
IMPORTANT: Do not manually create a folder and use it as the LLM’s working directory. You must use mdo_agent_work. This is because mdo_agent_work/results contains pre-defined LLM configuration files (hidden by default). You do not need to modify these configuration files.
The installation is finished!
Step 4. Test the agents
Follow the instructions below for your selected LLM to test the installation by running a small case.
-
Close both Docker and Claude Desktop apps. Then, open the Docker app first, wait until it is ready, and then open the Claude Desktop App.
-
In the top left, click the sidebar icon to expand it, then change the mode from “Chat” to “Code”.
-
Click the “Local” icon right above the chat box and select “Add another folder”. In the pop-up, select the
mdo_agent_work/resultsfolder. -
Then, ask
Is mdo_agent_deck's must_call_first tool available?. Once the agent confirms the MCP status (if not ask it to check again or close Claude and re-open), you can now ask questions such asGenerate a CFD mesh for the NACA2412 airfoil with 20K cells and yPlus 3. The agent will run the case in the background. -
Once the task is finished, you can click the names of the generated mesh pictures to view them in the app, or the links from the Trame or HTML servers to visualize the results.
During agent execution, you may be asked for permission multiple times. To skip this, change the “Mode” below the chat box to “Auto mode”. IMPORTANT: The auto mode may modify or damage system files. Use with caution!
NOTE: If you need to start a new chat, close Claude and re-open. This ensures the mdo_agent_deck is reset to run the next case. Try not to run multiple cases in one chat window, as it will use a lot of tokens!
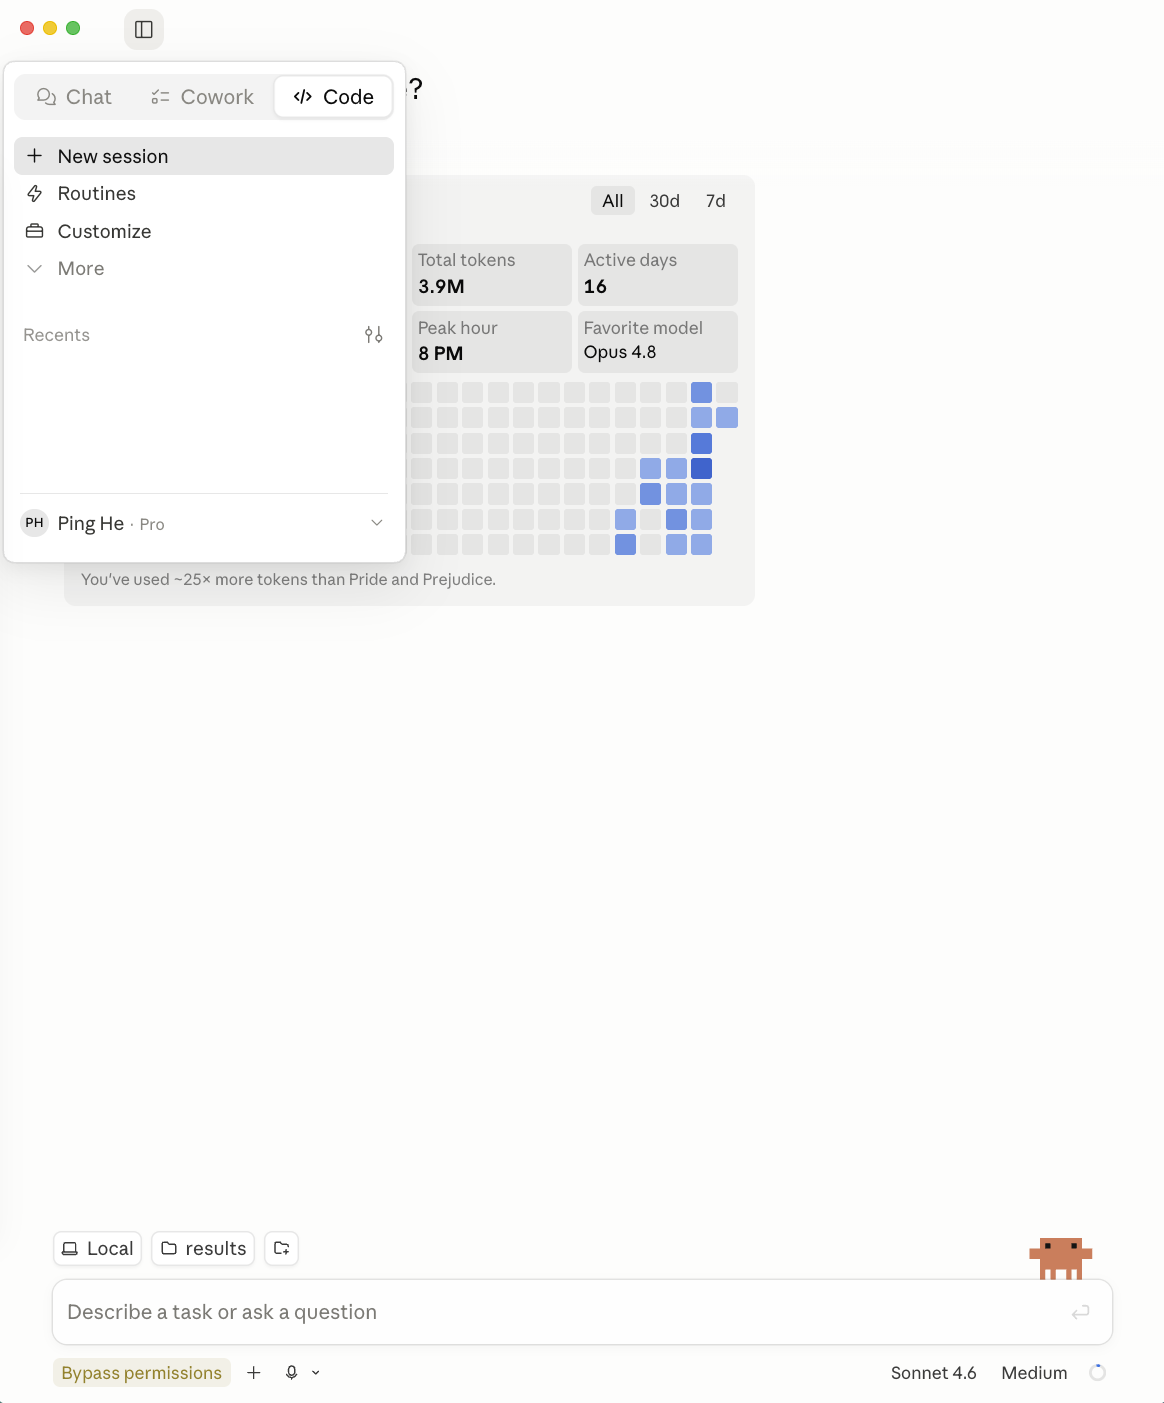
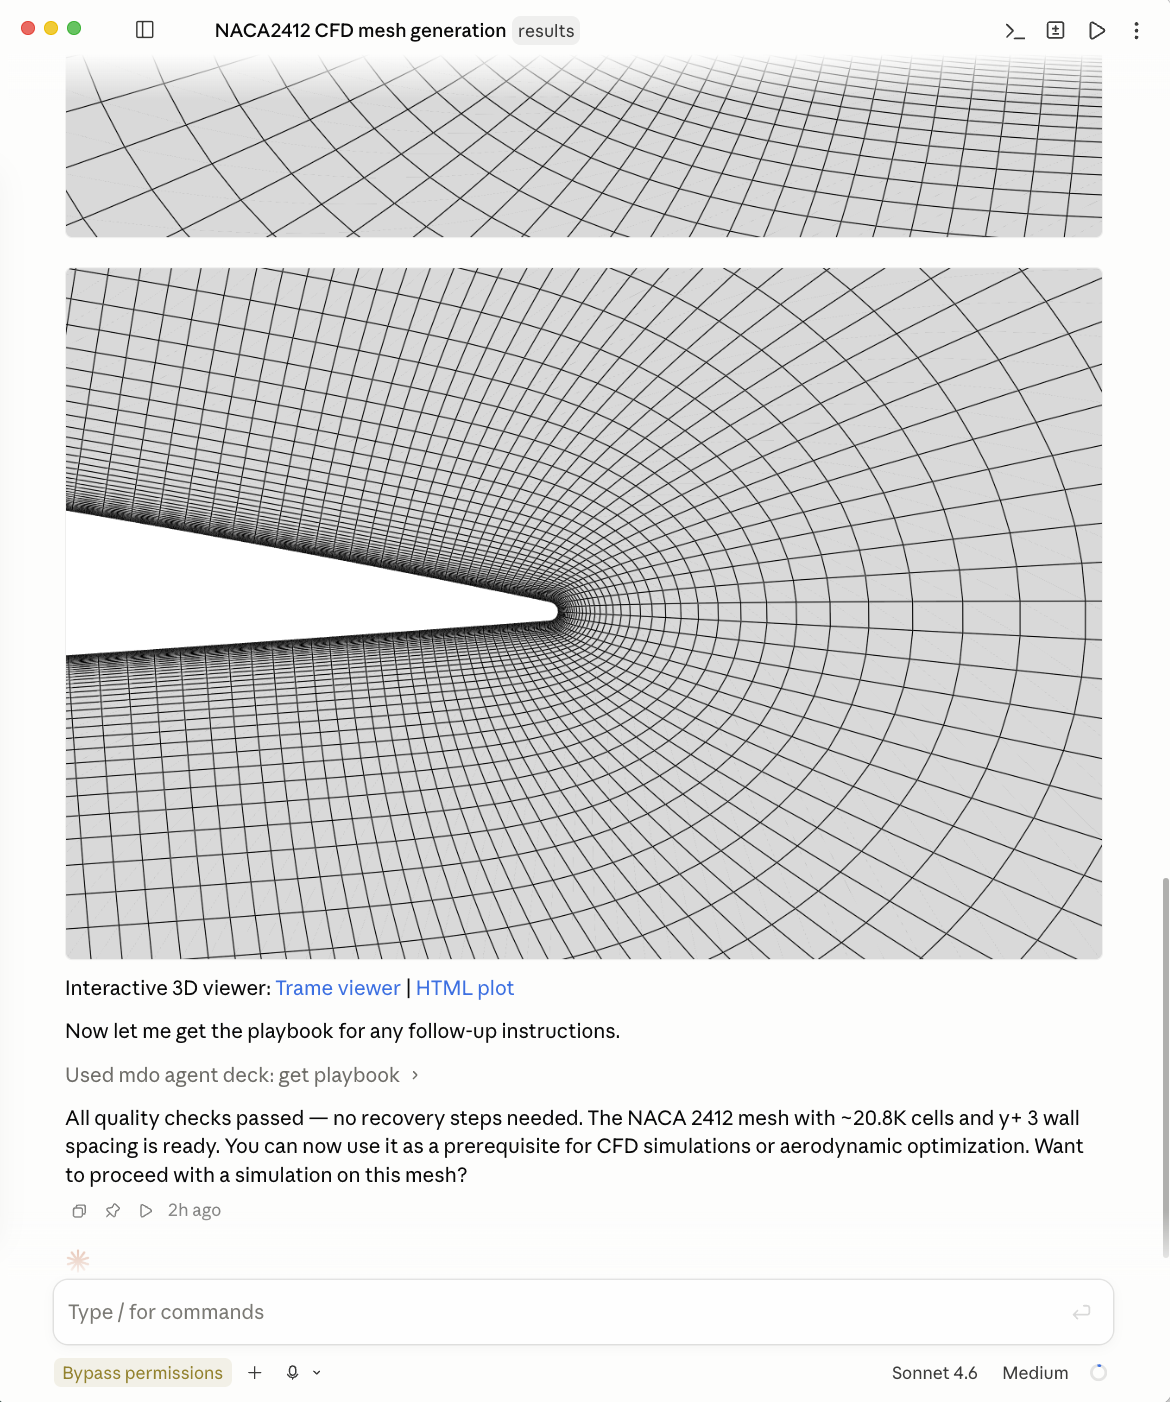
Fig. An example of the Claude Code interface
-
Close both Docker and Codex Desktop apps. Then, open the Docker app first, wait until it is ready, and then open the Codex Desktop App.
-
Click “Choose project” and hover over “New project”. Click “Use an existing folder”. In the pop-up, select the
mdo_agent_work/resultsfolder. -
Then, ask
Is mdo_agent_deck's must_call_first tool available?. Once the agent confirms the MCP status (if not ask it to check again or close Codex and re-open), you can now ask questions such asGenerate a CFD mesh for the NACA2412 airfoil with 20K cells and yPlus 3. The agent will run the case in the background. -
Once the task is finished, you can click the links from the Trame or HTML servers to visualize the mesh results.
During agent execution, you may be asked for permission multiple times. To skip this, change the “Mode” below the chat box to “Approve for me”. IMPORTANT: The Approve for me mode may modify or damage system files. Use with caution!
NOTE: If you need to start a new chat, close Codex and re-open. This ensure the mdo_agent_deck is reset to run the next case. Try not to run multiple cases in one chat window, it will use a lot of token!
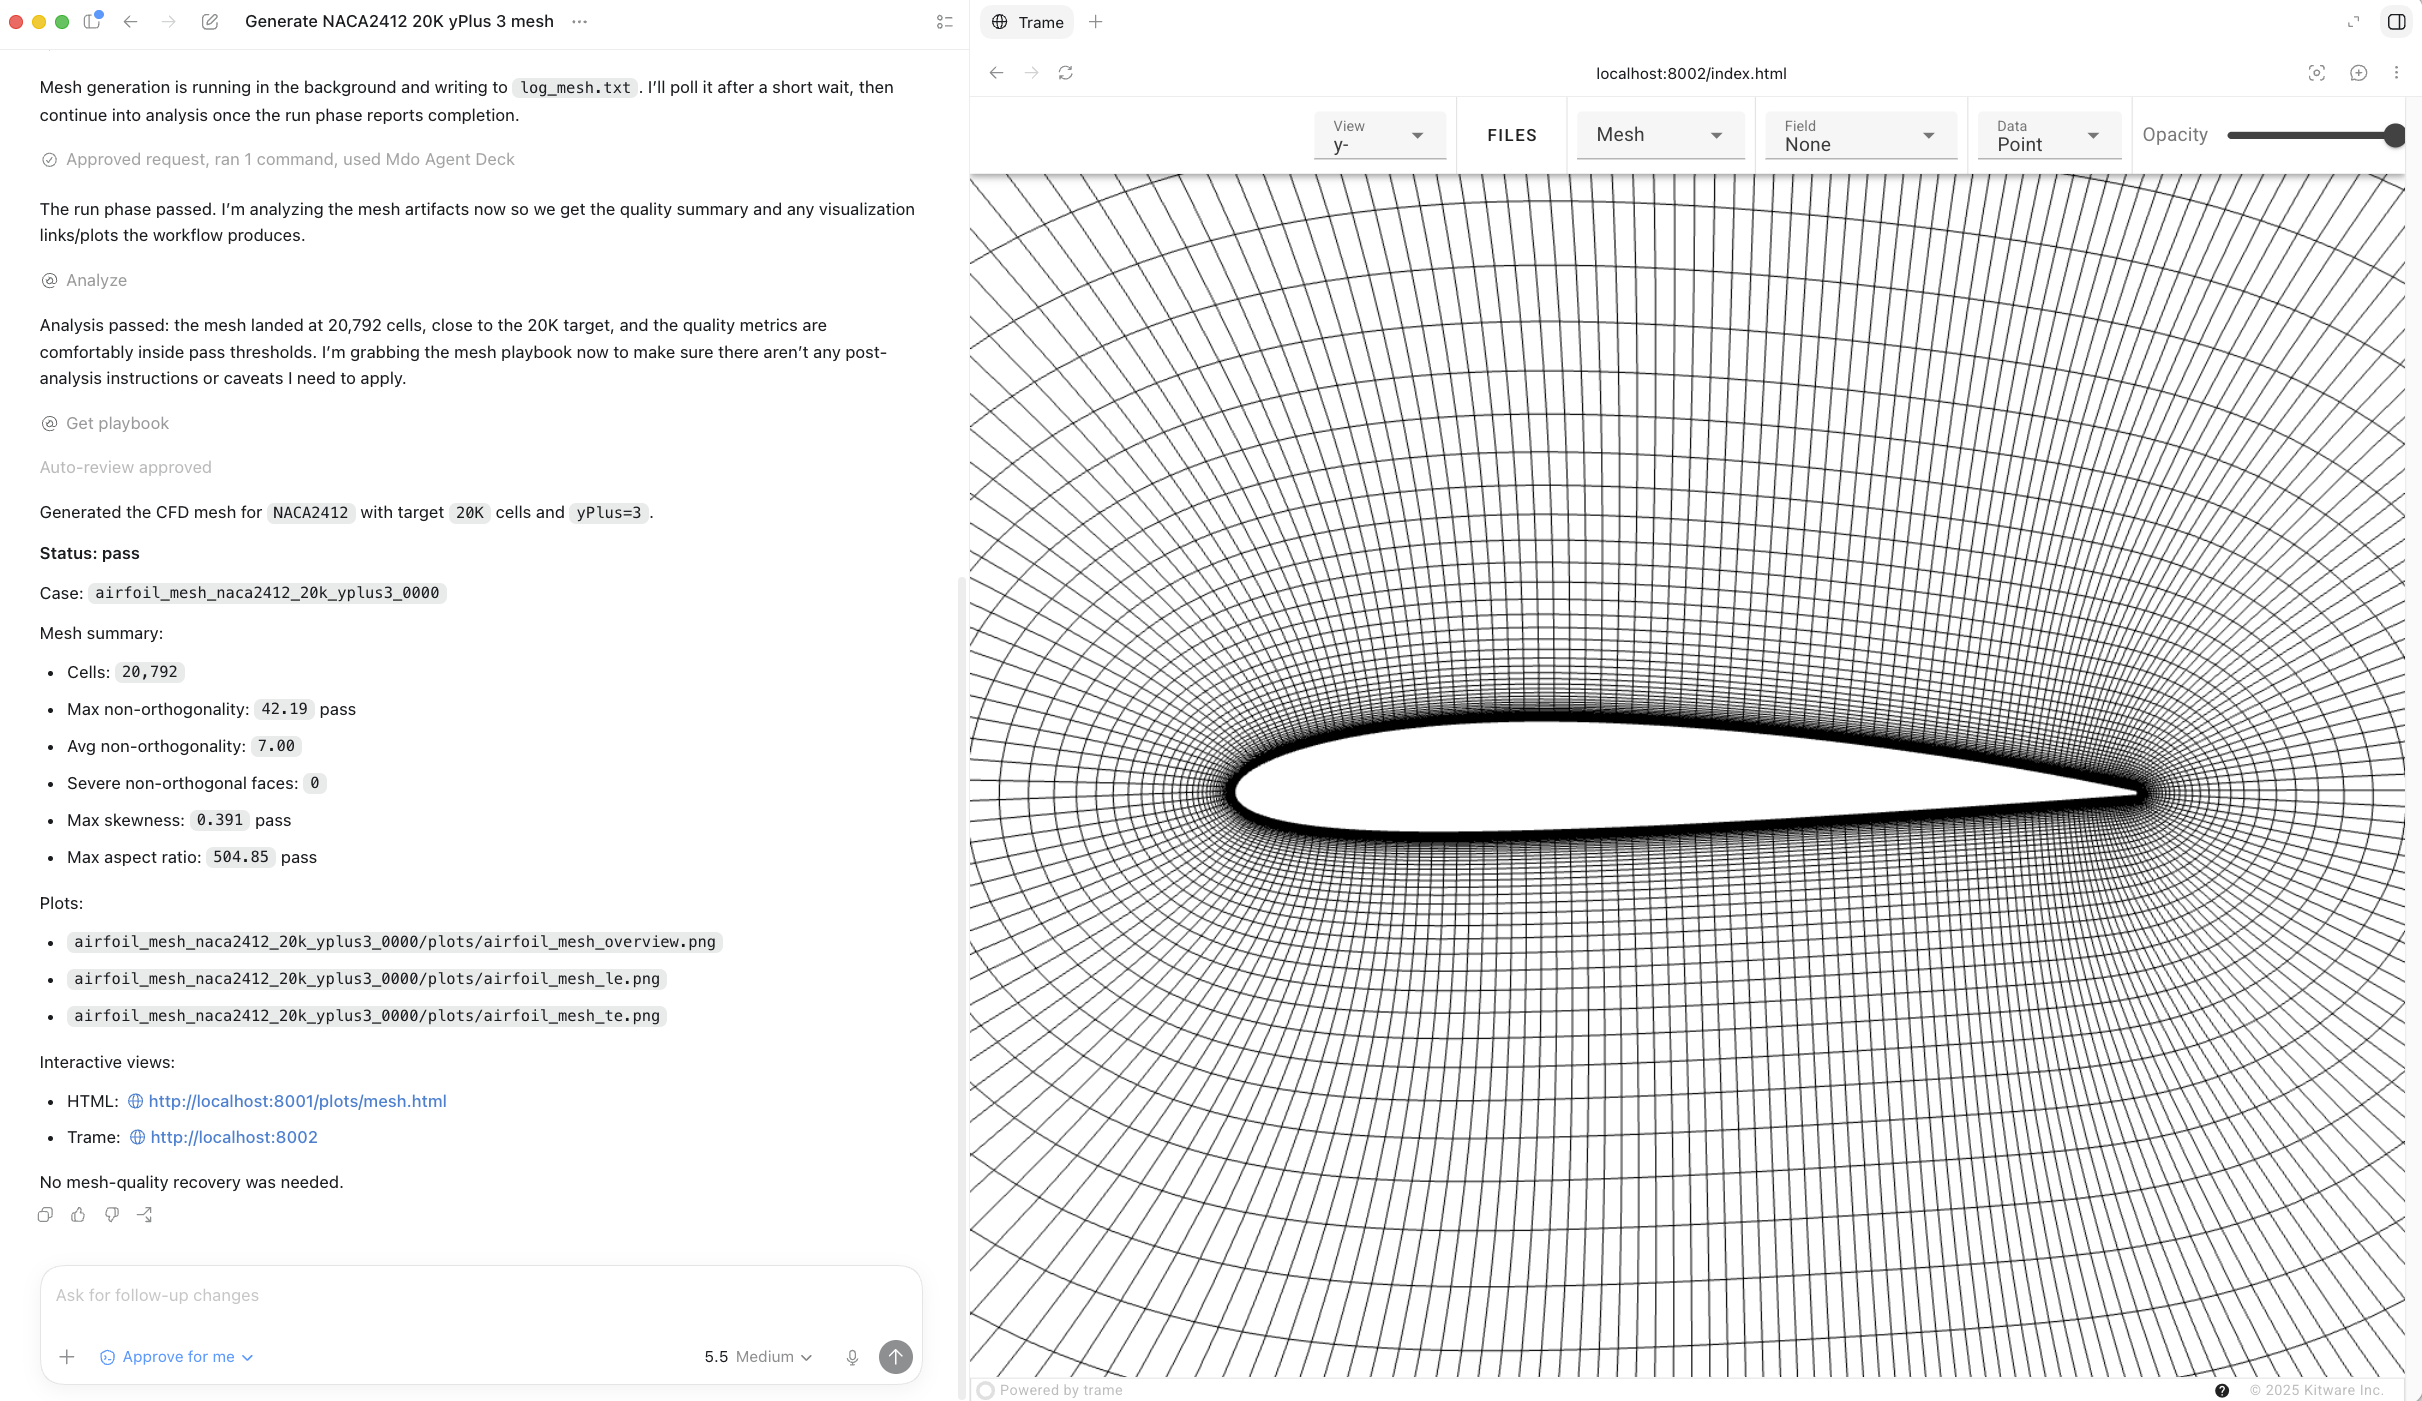
Fig. An example of the Codex interface
Option B: Local Computers with VSCode
Option B also supports both Windows and MacOS, and it relies on VSCode and LLM command-line interface (CLI) instead of LLM Desktop Apps. Compared with Option A, Option B has a built-in interface for case file management, which allows you to quickly visualize case log files, figures, etc, and it also has a unified interface across different LLM models; however, it requires a few additional steps for installation.
Step 1. Install an LLM client CLI
First, install a command-line interface (CLI) for an LLM client. The MDO Agent Deck supports multiple LLM clients, but for this setup, you only need to install ONE CLI client.
NOTE: You must sign up for an account for the selected LLM and log in using your subscription. Do NOT use API keys. If you already have a paid subscription for one of the following LLM providers, install its app. Otherwise, choose an LLM that offers a free but limited usage quota (we recommend Codex). Note that most free-tier LLMs limit you to roughly 10 prompts per cycle and are suitable for evaluation only. For production use, a paid plan is required.
Please follow the following installation instructions for your selected client. The installation steps may differ by operating system and may require additional dependencies such as Node.js.
- Claude (Anthropic; paid plan only): Install
- Codex (OpenAI; limited free quota): Install
- Antigravity (Google; limited free quota): Install
- Cursor (Anysphere; limited free quota): Install
Step 2. Install Docker Desktop
Same as the Step 2 in Option A.
Step 3. Download the working directory
Same as the Step 3 in Option A.
The installation is finished!
Step 4. Test the agents
-
Open VS Code. Then, click the “Explorer” icon in the left sidebar (see the Fig. below). From there, select “Open Folder” and open the
mdo_agent_workfolder as your working directory. -
Click the “Toggle Panel” button in the top-right corner to open a terminal (see the Fig. below). Then, in the terminal, navigate to the
mdo_agent_work/resultsfolder. IMPORTANT: Open themdo_agent_workfolder in Explorer, then use the terminal to navigate tomdo_agent_work/resultsbefore starting the LLM CLI. This is intentional and helps avoid conflicts with VS Code LLM extensions. You must start the LLM in themdo_agent_work/resultsfolder. The name of theresultsfolder can be arbitrary. If you need to run multiple cases, you can make copies of theresultsfolder insidemdo_agent_work, e.g.,mdo_agent_work/results1andmdo_agent_work/results2. -
Launch your LLM client in the VSCode terminal and sign in. Choose ONLY ONE of the following, depending on which LLM client you are using.
codex –yolo
claude –dangerously-skip-permissions
agy –dangerously-skip-permissions
agent –yolo
IMPORTANT: All the above commands bypass the permission, so they may modify or damage system files. Use with caution! If you prefer manual permissions, run the LLM CLI without the –yolo or –dangerously-skip-permissions argument
-
In the LLM CLI chat box, run
/mcpand verify if themdo_agent_deckisconnectedorrunning. If yes, the agent is ready to run. -
You can ask something like:
Generate a CFD mesh for the NACA2412 airfoil with 20K cells with yPlus 5. The agent will parse your prompt into solver input arguments and run predefined commands to generate the mesh, then return clickable paths to the mesh figures along with a summary of the mesh. You can hold the Command key (MacOS) or Control key (Windows) and click these paths to view the figures directly in VS Code (see the Fig. below). The agent will also return a clickable link for a Trame server to view the mesh interactively. You can open this server from your default browser by clicking the link.
NOTE: For the best visual experience, we recommend using the “Light Modern” color theme in VS Code. To change the theme, open the Command Palette in VS Code, search for “Preferences: Color Theme”, and select “Light Modern”.
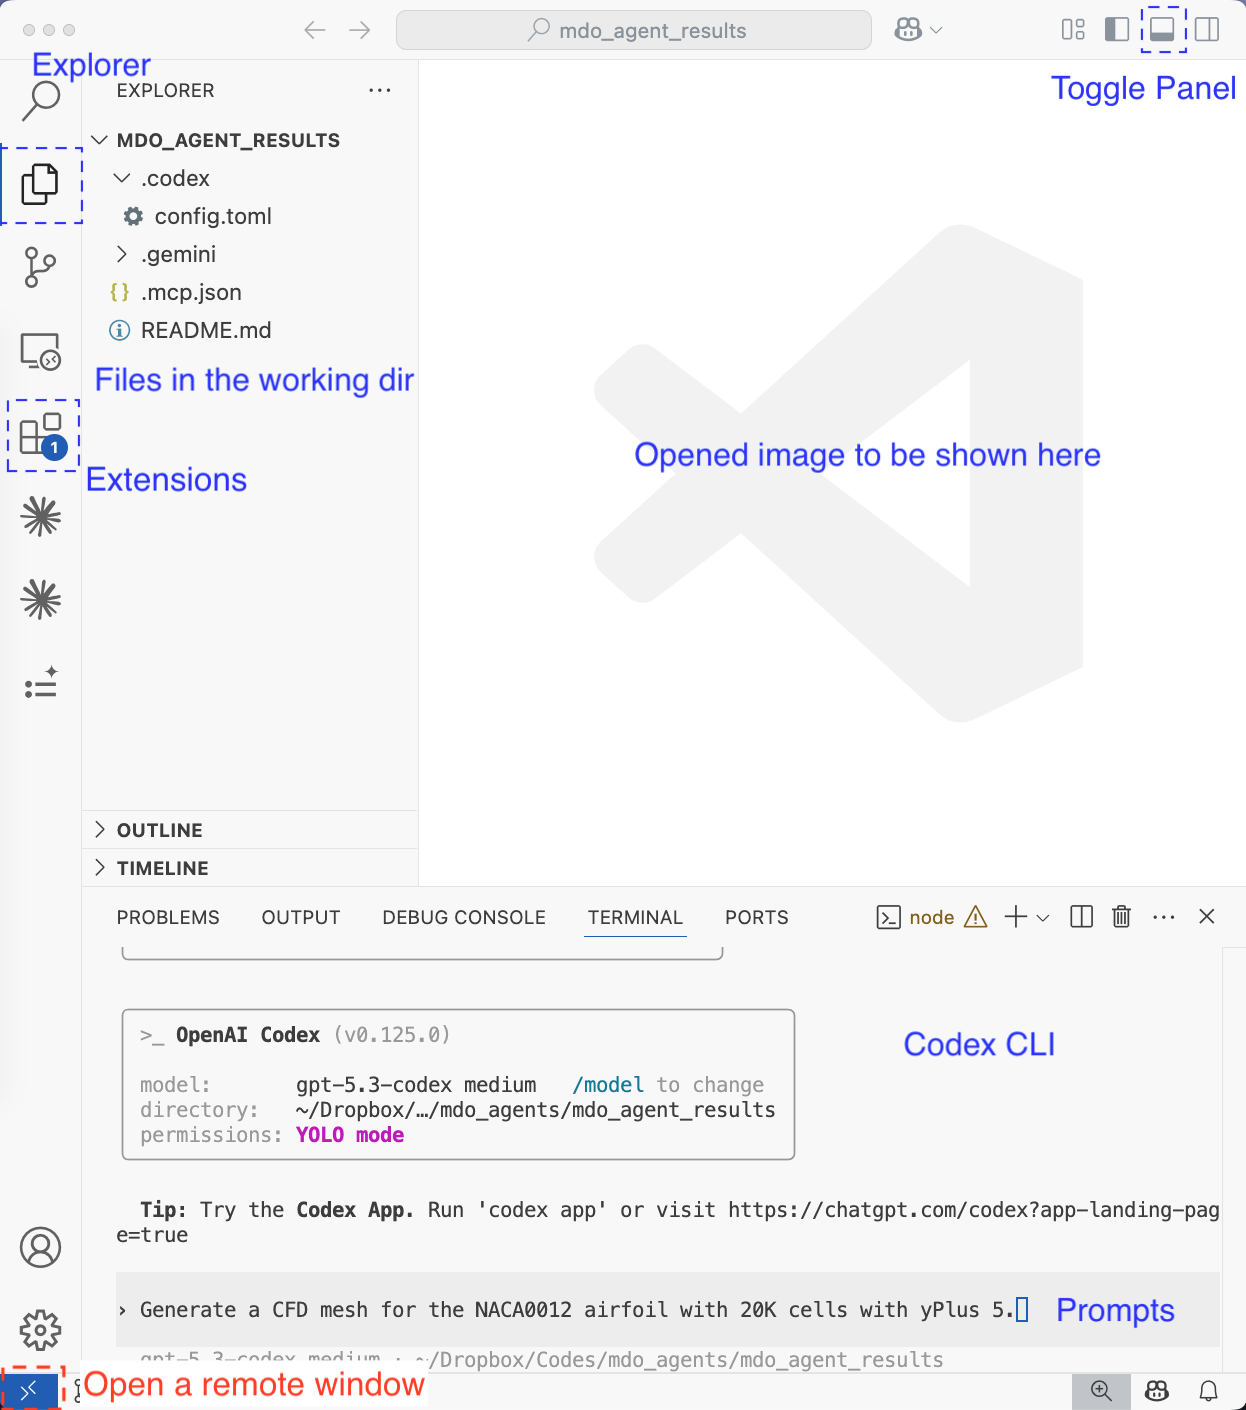
Fig. An example of the VS Code interface for Codex. Other LLMs have similar interfaces
Option C: HPC Clusters with LLM Apps
This Option is for running large-scale cases on an HPC cluster. Currently only Claude Desktop App supports remote HPC connection.
Step 1. Install an LLM Desktop App on your computer
Same as Step 1 in Option A. NOTE: you need to install the LLM desktop app on your computer, instead of the HPC.
Step 2. Compile the agents and DAFoam on the HPC
Use SSH to login to the HPC. Then, compile the DAFoam package from scratch there. Follow the instructions from here. In this example, we assume DAFoam is installed in /home/your_user_name/dafoam and will use this path for the instructions below.
After DAFoam is compiled, load its environment, e.g., . /home/your_user_name/dafoam/loadDAFoam.sh, and then run the following command to install the MDO Agent Deck:
pip install mdo_agent_deck==v0.2.3
NOTE: The mdo_agent_deck package is hosted on PyPI. You can also install a different version by changing the tag v0.2.3.
Then, add the following line to your ~/.bashrc on the HPC to automatically load DAFoam when logging in.
. /home/your_user_name/dafoam/loadDAFoam.sh
Step 3. Create the working directory on the HPC
Use SSH to login to the HPC, then, download mdo_agent_work repo from here. Note: this link is DIFFERENT from the one from Options A and B above.
Unzip it and you will see a folder called mdo_agent_work-hpc. Rename it to mdo_agent_work. This will be the main working directory for your agents. You can put mdo_agent_work anywhere on the HPC, e.g., /home/your_user_name/mdo_agent_work.
IMPORTANT: Do not manually create a folder and use it as the LLM’s working directory. You must use mdo_agent_work. This is because mdo_agent_work/results contains pre-defined LLM configuration files (hidden by default). You do not need to modify these configuration files.
Step 4. Customize the HPC job submission script
Open mdo_agent_work/results/myHPCJob.sh and adjust the #SBATCH directives (walltime, nodes, cores, job name) to match your HPC cluster. Keep the filename as myHPCJob.sh, keep it in the mdo_agent_work/results/ folder, and always keep ./Allrun.sh as the last line of the script. This script will be used by the agent to submit jobs on your HPC.
Step 5. Test the agents
-
Open the Claude Desktop App and sign in.
-
In the top left, click the sidebar icon to expand it, then change the mode from “Chat” to “Code”.
-
Click the “Local” icon right above the chat box and select “Add SSH Host”. In the pop-up, fill out the “Name” (e.g.,
my_hpc) and “SSH Host” (e.g.,my_user_name@myhpc.com). Leave the “SSH Port” and “Identity File” as is. Once done, click “Add SSH Connection”. -
Click the “Local” icon again and select the newly added SSH server, e.g.,
my_hpc. You will be prompted to enter your HPC account password and the verification code (if applicable). NOTE: The Claude app does not distinguish between the password and verification code prompts from your HPC, so the pop-up window will always say it needs a password. If it asks for the password twice, the second prompt is likely requesting your verification code. -
Once connected, you can click the button right next to “Local” to “Browse Remote Folder”. Navigate to the
mdo_agent_work/resultsfolder. -
The agent is ready to use. You can ask something like:
Generate a CFD mesh for the NACA2412 airfoil with 20K cells with yPlus 5. NOTE: On the HPC, the agent will submit jobs to run cases on compute nodes, instead of head nodes. -
Once the task is finished, you can click the names of the generated mesh pictures to view them in the app, or the links from the Trame or HTML servers to visualize the results. You cannot directly access the case folder on the Claude Desktop App. To view the files in the case folder, you need to use a separate SSH to connect to the HPC and navigate to
mdo_agent_work/results.
During agent execution, you may be asked for permission multiple times. To skip this, change the “Mode” below the chat box to “Bypass permissions”. IMPORTANT: The Bypass permissions mode may modify or damage HPC system files. Use with caution!
Option D: HPC clusters with VSCode
This option is for running large-scale cases on an HPC cluster. Option D is similar to Option C, except that it uses VSCode as the interface to the HPC. Compared with the Claude Desktop App, VSCode allows you to run agents and view files in the case folder simultaneously.
Step 1. Install VS Code and Remote SSH
Download VS Code from here and install it.
Optional: Some newer versions of VS Code may experience issues when connecting to HPC systems. If you run into this issue, try an older version of VS Code: 1.100.3.
Open VS Code. From the left panel, click Extensions (see Fig. 1 below), then search for Remote SSH by Microsoft and click Install.
After installing Remote SSH, set up the SSH connection:
-
Click the
Open a Remote Windowbutton in the lower-left corner of VS Code (see Fig. 1 below). -
In the pop-up window on the top, select
Connect to Host, then choose+ Add New SSH Host. -
In the pop-up window, enter your SSH command, for example:
ssh my_user_name@nova.its.iastate.edu. -
When prompted, select the SSH configuration file to update (choose
~/.ssh/configor similar). -
Once the SSH configuration is complete, click
Connect to Hostagain and select your newly added host (e.g.,nova.its.iastate.edu). You will be prompted to enter your password and, if applicable, a verification code to log in to the HPC. -
If the terminal is not visible after opening the folder, click
Toggle Panelin the top-right corner of VS Code (see Fig. 1 below).
DO NOT close VS Code or the open terminal on the HPC. We will use them to install other packages in the following steps.
Step 2. Install an LLM client on the HPC
Using the terminal in VS Code via Remote SSH, install an LLM client’s command-line interface (CLI) on the HPC. The installation commands are the same as those for local computers; refer to Option B -> Step 1. Install an LLM client CLI above.
Step 3. Install the agents and DAFoam on the HPC
Same as the Step 2 in Option C. Except that you can use the terminal from VSCode to compile DAFoam and the agent.
Step 4. Create the working directory
Same as the Step 3 in Option C. Except that you can use the terminal from VSCode to download the working directory repo.
Step 5. Customize the HPC job submission script
Same as the Step 4 in Option C.
Step 6. Test the agents
-
Open VS Code and use Remote SSH to connect to the HPC.
-
In VS Code, click the “Explorer” icon in the left sidebar (see the Fig. in Option B above). From there, select “Open Folder” and open the
mdo_agent_workfolder on the HPC as your working directory. -
Click the “Toggle Panel” button in the top-right corner to open a terminal (see the Fig. in Option B above).
-
In the terminal, navigate to the
mdo_agent_work/resultsfolder on the HPC. IMPORTANT: Open themdo_agent_workfolder in Explorer, then use the terminal to navigate tomdo_agent_work/resultsbefore starting the LLM CLI. This is intentional and helps avoid conflicts with VS Code LLM extensions. You must start the LLM in themdo_agent_work/resultsfolder. The name of theresultsfolder can be arbitrary. If you need to run multiple cases, you can make copies of theresultsfolder insidemdo_agent_work, e.g.,mdo_agent_work/results1andmdo_agent_work/results2. -
Launch your LLM client in the VSCode terminal on the HPC and sign in. Choose ONLY ONE of the following, depending on which LLM client you are using.
codex –yolo
claude –dangerously-skip-permissions
agy –dangerously-skip-permissions
agent –yolo
IMPORTANT: All the above commands bypass the permission, so they may modify or damage system files. Use with caution! If you prefer manual permissions, run the LLM CLI without the –yolo or –dangerously-skip-permissions argument
-
In the LLM CLI chat box, run
/mcpand verify if themdo_agent_deckisconnectedorrunning. If yes, the agent is ready to run. -
You can ask something like:
Generate a CFD mesh for the NACA2412 airfoil with 20K cells with yPlus 5. The agent will parse your prompt into solver input arguments and run predefined commands to generate the mesh, then return clickable paths to the mesh figures along with a summary of the mesh. You can hold the Command key (MacOS) or Control key (Windows) and click these paths to view the figures directly in VS Code (see the Fig. in Option B above). The agent will also return a clickable link for a Trame server to view the mesh interactively. You can open this server from your default browser by clicking the link.
NOTE: For the best visual experience, we recommend using the “Light Modern” color theme in VS Code. To change the theme, open the Command Palette in VS Code, search for “Preferences: Color Theme”, and select “Light Modern”.
Option E: Locally Hosted LLM (No Internet and No Paid Plan)
Note: Option E is still in an experimental state.
This option works on Linux, macOS, and Windows. It lets you run the agents with a locally hosted LLM, so no internet access or paid plan is needed. The main drawback is that it requires a high-end GPU. The following setup has been tested on a Macbook with M5 Pro chip and 24 GB memory.
Step 1. Install Docker Desktop
Same as the Step 2 in Option A.
Step 2. Download the working directory
Same as the Step 3 in Option A.
Step 3. Download Ollama and Local LLMs
First, download Ollama, which hosts and runs local LLMs.
Once the download is complete, launch the Ollama desktop app and keep it open. Then, click the Ollama app icon, select “Settings”, and set the “Context length” to 64K in the settings window.
We currently support two local LLMs: Qwen3.5 and Gemma4. Follow ONLY one of the following sets of instructions to install a model. We recommend Qwen3.5.
Open a terminal and run ollama pull qwen3.5:9b to download the Qwen model with 9 billion parameters. This is the smallest Qwen model we have tested that works.
Next, we need to customize the default qwen3.5:9b model for our agentic workflow. Go to the mdo_agent_work/results folder and run ollama create qwen3.5-agent:9b -f .ModelFileQwen. This creates a customized model called qwen3.5-agent:9b, which we will use to run the agents.
Open a terminal and run ollama pull gemma4:12b to download the Gemma4 model with 12 billion parameters. This is the smallest Gemma4 model we have tested that works.
Next, we need to customize the default gemma4:12b model for our agentic workflow. Go to the mdo_agent_work/results folder and run ollama create gemma4-agent:12b -f .ModelFileGemma. This creates a customized model called gemma4-agent:12b, which we will use to run the agents.
Optional Checks: Before running the agents, you can verify that your hardware is powerful enough for the local LLM. Run ollama run qwen3.5-agent:9b --verbose if you use Qwen, or ollama run gemma4-agent:12b --verbose if you use Gemma4. After the model finishes loading, ask a simple question such as “Can you give me an overview of your understanding of CFD?” When the response is complete, check the eval rate reported at the end in tokens/s. Performance is generally acceptable if this value is above 15. During this test session, you can also check VRAM and RAM usage with ollama ps, which reports GPU and CPU usage percentages. Ideally, GPU usage should be 100%. If it is not, the model is likely too large for your hardware, and Ollama will offload inference to the CPU, which can significantly slow performance. The model should be smaller than 10 GB. When you are done, exit the chat session by typing /bye or pressing ctrl+c.
Step 4. Download an MCP Orchestrator
Once the local LLM is running, it must be connected to the MCP server. We have two options: Claude Code CLI or OpenCode CLI, and you need to install ONLY one of the following. We suggest OpenCode as it is faster. Claude Code is more robust but it thinks longer and take more time to finish a task than OpenCode.
Step 5. Test the agents
Open a terminal, go to the mdo_agent_work/results/ folder, and run one the following command from inside that folder, depending on which MCP Orchestrator you use
ollama launch opencode --config
ollama launch claude --config
The terminal will then ask you to “Select models”; select your local LLM, for example, qwen3.5-agent:9b or gemma4-agent:12b. Finally, choose Yes to open the MCP Orchestrator.
You must check one of the following before running a case, depending on which MCP Orchestrator you use:
If you use OpenCode CLI
- Check that the MCP is running. If the MCP server is running, you should see a green circle at the bottom say “1 MCP /status” (see the figure below). Alternatively, you can run
/mcpsin OpenCode to view the available MCP servers. You should seemdo_agent_deck connectedin the pop-up window. Pressescto close it. - Check the active LLM. The active LLM is shown at the bottom of the text entry box. It should display
qwen3.5-agent:9borgemma4-agent:12b(see the following figure). If it does not, run/models, press Enter, and select the correct local LLM from the menu. - Check the run mode. OpenCode has two modes:
Buildand Plan.Buildmode allows OpenCode to modify files, while Plan mode does not. To run the agents properly, make sure OpenCode is inBuildmode. You can toggle modes with theTabkey.
If you use Claude Code CLI
- Check that the MCP server is running. Run
/mcpin Claude to view the available MCP servers. You should seemdo_agent_deck connectedin the pop-up window. Pressescto close it. - Check the active LLM. The active LLM is shown at the top. It should display
qwen3.5-agent:9borgemma4-agent:12b(see the following figure). - Check the run mode. By default, Claude Code uses “manual mode on”. To streamline the agentic workflow, press the “Shift + Tab” keys to switch to “auto mode on” (see the following figure).
If all the above checks pass, you can ask the agent to run a task, such as Call mdo_agent_deck MCP's must_call_first() tool. Then run a steady CFD simulation for the NACA2412 airfoil with 10K cells, Ma=0.3, Re=5e6, and AoA=2 degs. The agent will parse your request, generate the appropriate mesh, and run the CFD simulation for you.
IMPORTANT. Both Claude and OpenCode may take a little longer (up to a few minutes) to spin up the agentic workflow because it needs to preload the MCP info into context. Once the agent starts working, response speed should return to normal. Sometimes, OpenCode stops in the middle of the workflow, and you need to manually ask it to “Continue” to move on to the next step.
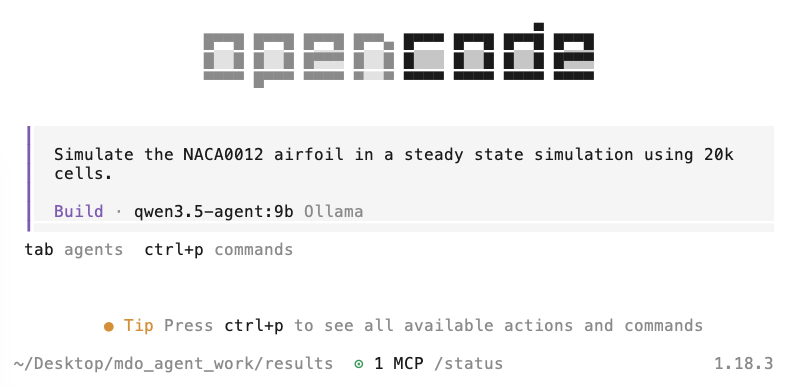
Fig. An example of the OpenCode interface for a locally hosted LLM
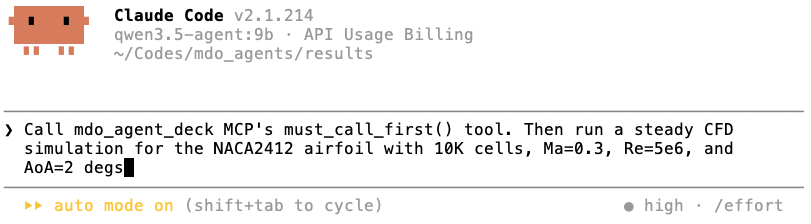
Fig. An example of the Claude interface for a locally hosted LLM