Overview
The MDO Agent Deck is an agentic AI framework for multidisciplinary design optimization (MDO). It exposes engineering workflows through an MCP server and orchestrates domain agents such as airfoil, wing, and aircraft. The MDO Agent Deck framework is not open source. Instead, it is distributed on PyPI as compiled shared library package for evaluation purpose. Check LICENSE for more details.
Trustworthy Agentic AI Framework for MDO
The framework is designed to be trustworthy for engineering using the following guardrails:
- Narrowly scoped, domain-specific agents.
- Strictly constrained input parameters per skill.
- A robust review-and-correction loop at each phase.
- Fully transparent, auditable, and reproducible execution workflows.
How the Framework Works
For each user request/prompt, the agent execution follows a pre-defined run sequence:
- A user requests to run an engineering analysis or design case.
- The MCP server identifies the best domain agent and skill for the user request.
- It reads skill pre-context to better prepare the case, e.g., how to dynamically prepare input parameters
- It semantically parses the input information from the user prompt into the skill’s input values.
- It creates a new isolated case folder and copies the pre-defined case configuration files from the selected agent.
- It runs the selected skill following the run->review->analyze->review workflow. All the skill’s predefined run commands are executed here.
- It reads the skill post-context with additional evaluations and instructions to correct potential errors.
- If everything passes, the final results, including PNG plots, an interactive visualization server, and a case summary, are sent back to the user.
This review gate after every phase is a key guardrail. If a review fails, the workflow stops and requests correction before moving forward.
For example, if a user asks:
Generate a CFD mesh for NACA0012 at Mach 0.05, Reynolds 20,000, y+ target 50.
The execution will look like this:
- The MCP server identifies the
airfoilagent and thegenerate-cfd-meshskill for this request. - It reads the pre-context and no special treatment is needed.
- It semantically parses the user prompt into skill inputs (
airfoil_profile=naca0012,mach_number=0.05,reynolds_number=20000,y_plus_target=50). - It creates a new isolated case folder, e.g.,
airfoil_mesh_naca0012_ma005_20k_y50_0000, and copies all DAFoam configuration files from the airfoil agent into this folder. - The
generate-cfd-meshskill is executed. In run, it copies geometry and mesh configuration files into that folder and run a bash script that contains the predefined mesh generation commands. In analyze, it computes mesh quality metrics, verifies whether the mesh quality passes thresholds, and generates mesh plots. - It reads the post-context for the
generate-cfd-meshskill. If the mesh quality fails, it will follow the instructions to correct it. - The mesh plots, interactive visualization servers, and a report regarding the mesh quality and number of mesh cells are passed back to the user.
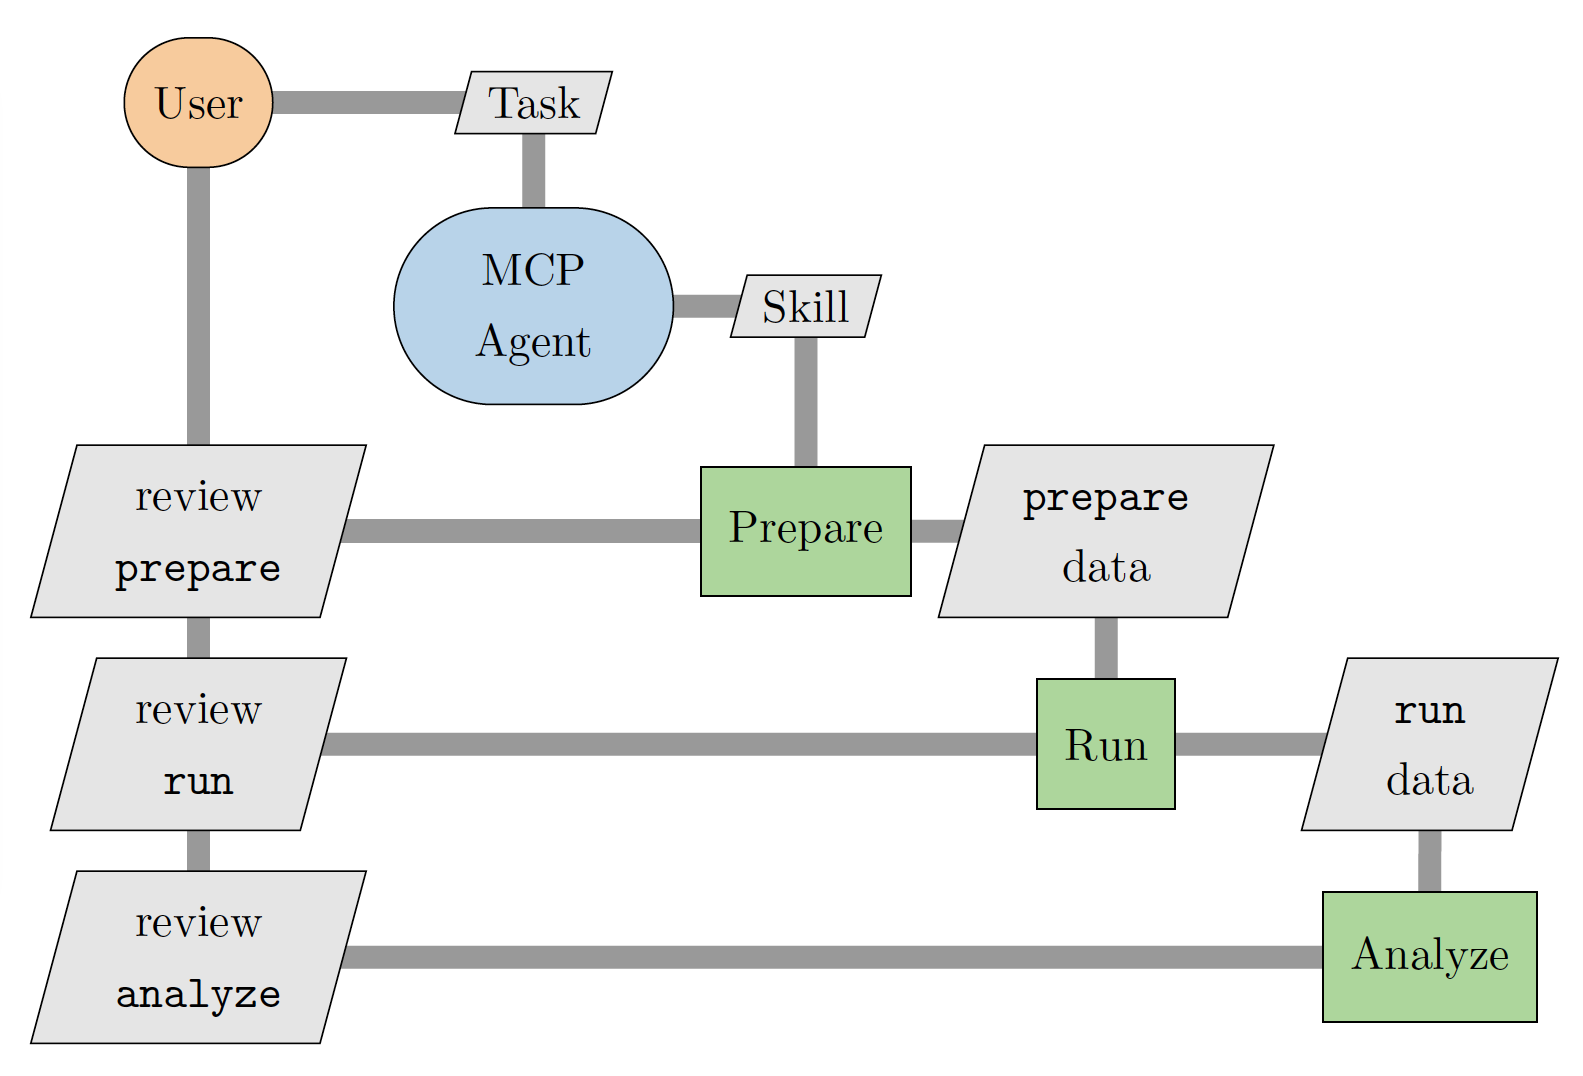
Fig. 1. Schematic of the agentic AI workflow
Transparency, Auditability, and Reproducibility
The framework records workflow and runtime context in the working directory. This design supports traceability, debugging, and reproducibility for engineering studies.
agent_workflow.json: auditable case-by-case phase history (set_skill_inputs,run,review_run,analyze,review_analyze) with timestamps and status.agent_state.json: persisted bindings (inputs and case directories) so sessions can resume after MCP server restarts.bash_*.sh: the agent generates abash_*.shscript for eachrunandanalyzephase, e.g.,bash_generate-cfd-mesh_run_001.sh. A user can easily reproduce the exact workflow the agent executed by running these bash scripts in sequence.
Reference
Ping He, Lean Fang, Jiawei Chen, Seth Zoppelt, and Christian Psenica. “Trustworthy Agentic AI for Aircraft Aerodynamic and Aerostructural Design Optimization.”, paper in preparation. 2026.